

Creating an apply button that collects parameter and relevant filter selections to execute a single query is a common user request for Tableau dashboards.
However, we run into a lot of asynchronous problems when we navigate back and forth to different dashboards within the workbook that also require filter selections.

The most common workaround is to create a "global filter page" that is
a separate dashboard. This design helps to mitigate mismatches in
filtering values by centralizing the source of the apply button.
Based on action filters, this requires users to:
1. Leave the dashboard they want to filter.
2. Select and apply the filters from the filtering
dashboard.
3. Navigate back to the previous dashboard to see the
filtered results.
We need a force that can bind filter selections together, across all dashboards in the workbook.
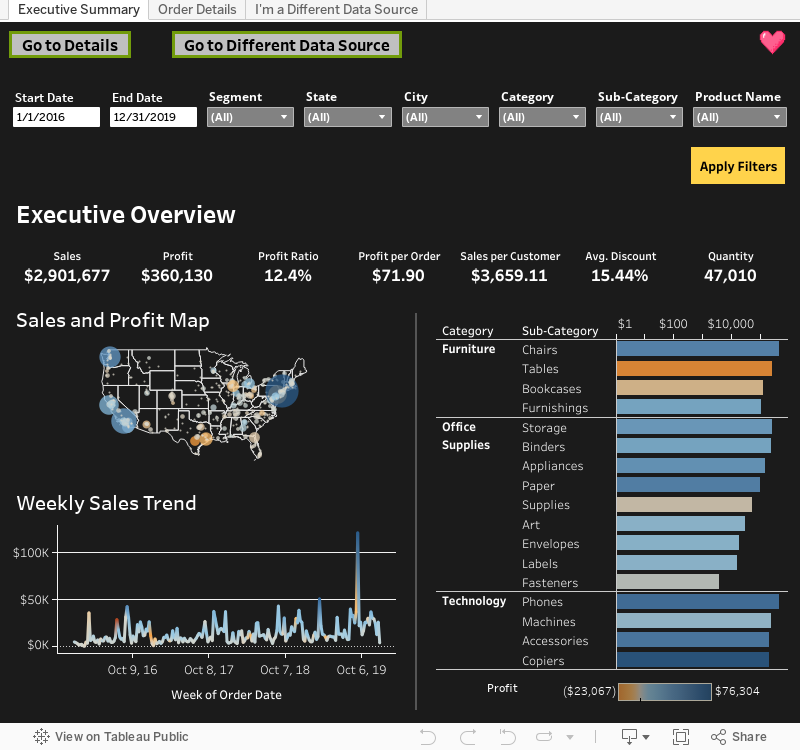
Behold the power of the Universal Apply Button!

Features:
- Parameter selections
- Invalid date warning
- Relevant filter values (without hitting "Apply")
- Single click query
- Filters can be changed on any dashboard
- Applies across multiple data sources
- Filters remain in sync through navigation
- Workbook-wide
What's the secret?
- Filters are driven by Set Actions - not Action Filters.
Hmmm... Ready are you?
Click here to download the sample workbook or from below:
Contents: (Click to Jump to)
Step 1: Make an "Apply Filters" Worksheet for your button
Step 2: Create Sets of the Dimensions to be Filtered
Step 3:
Place Sets on Worksheets as Filters
Step 4: Create Set Actions
Step 5: Got a Date? Set up Parameter Actions and an "Invalid Date"
Warning
Step 6: Have Multiple Data Sources? Blend and Use Set Actions
Step 1: Make an "Apply Filters" Worksheet for your button
This step is featured on Tableau's Knowledge Base here, but do NOT apply Action Filters.
To make your "Apply Filters" worksheet, simply:
1. Create a worksheet.
2. Add the filters you want displayed on the dashboards in the
Filters box.
3. Place these fields on Detail in the Marks box.
4. Choose Polygon as your Marks type.
5. Click in Rows and type " Apply Filters".
6. Go to Format > Shading > Default > Header and pick a
color for your button.
Your worksheet should look something like this:

6. Put this "Apply Filters" worksheet on the dashboard(s) you want
your filters to be.
7. Add filters to the dashboard(s). Have them only apply to the
"Apply Filters" worksheet.
8. For Only Relevant Values, choose this option for the filter when
adding them to the dashboard.
To create these Sets:
1. Go to a worksheet, right-click on a dimension that is on your
"Apply Filters" worksheet > Create > Set...
2. Select "All"

All you need to do for this step is:
1. Grab your sets and place them in the Filters box.
2. Right click on the filter > Apply to Worksheets > Selected
Worksheets
3. Select all worksheets in the dashboard(s) you'd like to have
filtered.
Do not include the "Apply Filters" worksheet.

To create the Set Actions:
1. Go to a dashboard. Go to Dashboard > Actions > Add Action
> Change Set Values...
2. For the Source Sheets, select the data source - not the dashboard - and then select the "Apply Filters".
3. Choose a Target Set. Select "Assign values to set" and "Keep set
values".

Do this for every set you created for the filters. That's it! You're
done.
To create a parameter action for your date, you can read about it on
the Flerlage Twins blog (awesome blog posts, btw)
here.
Steps:
1. Create a calculation of the date parameter and name it "Start Date
Chosen". This calculation will be bridge that allows us to perform a
parameter action.

2. Duplicate your date parameter and name it "Start Date Applied".
3. Use "Start Date Applied" in your calculations.

4. Go to the "Apply Filters" worksheet.
5. Put the dates on Detail and choose Exact Date (if
applicable).

6. Go to Dashboard > Action > Add Action > Change
Parameter. Choose the data source and your "Apply Filters"
worksheet.
7. For Target, choose the parameter tagged "Applied" and the
appropriate "Date Chosen" field.

Now let's get fancy with an "Invalid Date" warning!
To create an "Invalid Date" warning, we are going to:
1. Create another worksheet named "Error Text" and create a string
that says "Invalid Dates" on the Label Marks. You can also add a
tooltip that directs the user on why they received the error like,
"Check the Date Selections".
2. Now, add some Boolean logic to the filter of this worksheet and
the "Apply Filters" worksheet. Do not use the duplicated parameters for this date logic.

3. Next, put the [Invalid Date?] field on the Filters box of the
"Error Text" and set the value to True.

4. Go to the "Apply Filters" worksheet and put the [Invalid Date?] field on the Filters box of the "Error Text"
and set the value to False.
5. Create a vertical layout container and place it on the dashboard.
(I like to float mine.)
6. Place both the "Error Text" and "Apply Filters" worksheets in the
layout container. Now, if an invalid date selection is chosen, the
"Apply Filters" button is disabled and this error will pop up to help
guide the user.
For this multiple data source example, we are using the Sales Target
(US) data source along with our Superstore data source.
1. Go to the "Apply Filters" sheet.
2. Drag in the common fields of the data sources you plan to filter
on to Details. (ex: Category and Segment.)

3. Be sure to link them.

4. Now, we repeat Steps 2 - 4 by creating sets for the fields in the secondary data source, putting them on filters, and only applying them to the worksheets that use the secondary data source as the primary data source.
However, for these Set Actions, we will scroll up to the "All" option
for Source Sheets and then only select our "Apply Filters" worksheet.
The Target Set data source will be the secondary data source.

And there you have it. You have mastered the Universal Apply
Button.

“The Filters Will Be With You – Always.”

Comments
Post a Comment
Leave a reply