
Often we want to add text to help explain a dashboard's data story and highlight insights for our viewers. (For example, explaining a surge in sales in a weekly update to executives.)
However, in the real world, many of our users may not have the proper permissions to edit content on Tableau Server and we might not want to overwrite a workbook every time new notes are needed.

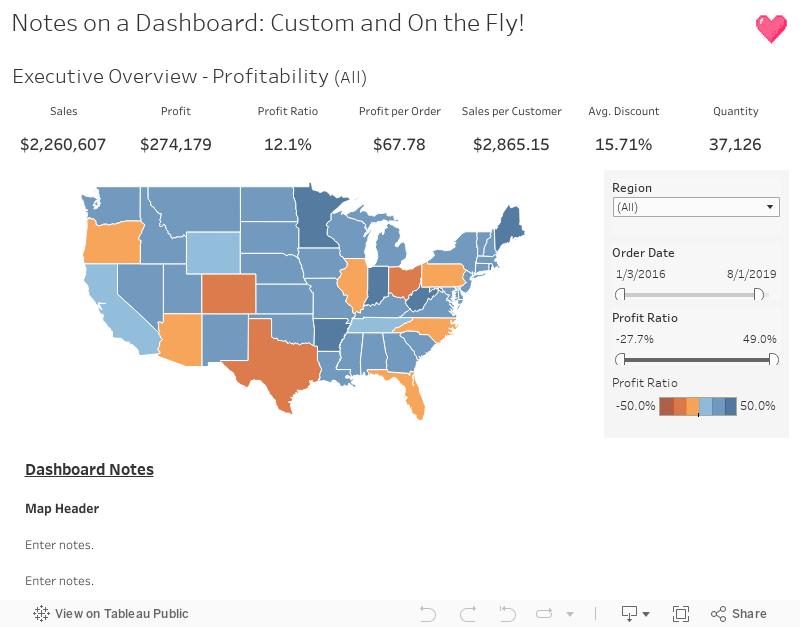
The solution is to have the ability to create and edit notes for the dashboard on the dashboard.
But how, you ask?! Simple... We are going to use parameters!
Ready to download the example workbook?
Click here.
Contents: (Click to Jump to)
Step 1: Create Parameters for Note Entry
Step 2: Create Calculated Fields to Display the Parameter
Value
Step 3: Display the Notes on the Dashboard
Step 4: Hide the Note Entry Parameters
Step 1: Create Parameters for Note Entry
The amazing thing about parameters is there is no character limit. If we had a DBA create a field in the backend for notes, then we are most likely subject to a character limitation. Flat files are limited to 255 characters per field and SQL Server character limits depend on the database
and driver combination. If we create a calculated field for notes, not everyone may have the correct permissions to edit the calculation and we would have to overwrite the workbook every time new notes are needed.
Using parameters for customizable, on the fly the note
entry is the perfect solve for unlimited character
strings and enables true self-service for users.
Each header and paragraph will need its own parameter.
This is so we can have different formats for each
parameter value and because we cannot have line breaks in
the parameter values. (I like to number the different
entry parameters in order they will appear as
notes.)
All parameters will be String data types and have "All"
for Allowable values.
Here is the parameter for the header of our notes.
 Since we want a line break for our notes, we create two
parameters.
Since we want a line break for our notes, we create two
parameters.


The amazing thing about parameters is there is no character limit. If we had a DBA create a field in the backend for notes, then we are most likely subject to a character limitation. Flat files are limited to 255 characters per field and SQL Server character limits depend on the database
and driver combination. If we create a calculated field for notes, not everyone may have the correct permissions to edit the calculation and we would have to overwrite the workbook every time new notes are needed.
Using parameters for customizable, on the fly the note
entry is the perfect solve for unlimited character
strings and enables true self-service for users.
Each header and paragraph will need its own parameter.
This is so we can have different formats for each
parameter value and because we cannot have line breaks in
the parameter values. (I like to number the different
entry parameters in order they will appear as
notes.)
All parameters will be String data types and have "All"
for Allowable values.
Here is the parameter for the header of our notes.


Step 2: Create Calculated Fields to Show the Notes
This is a super simple step. We only need to reference
the parameter in the calculated field. That's it!

This is a super simple step. We only need to reference
the parameter in the calculated field. That's it!

Step 3: Display the Notes on the Dashboard
To display the notes on the dashboard, we create a
worksheet and bring in the calculated fields we just
created into the Text on the marks card.
 It is here we can introduce formatting.

Place the worksheet on the dashboard where you'd like
to display the notes.

To display the notes on the dashboard, we create a
worksheet and bring in the calculated fields we just
created into the Text on the marks card.

It is here we can introduce formatting.

Step 4: Hide the Note Entry Parameters
Time to put the rabbit in the hat! These parameters do not need to be
exposed to the end user, so we're going to hide them from the default
view but still have them available to edit. To accomplish this task, we
are going to create a floating vertical container, place the parameters
in the container,
hide the menu, and then toggle from floating to tiled.
1. Create a floating vertical container.

2. Place the parameters in the floating container.

3. Click on the down arrow of the floating parameter, and select "Add
Show/Hide Button"


5. For this step, I make the button the title of the notes. To do this,
choose "Text Button" for the Button Style and type "Dashboard Notes" for
the Title when the item is hidden.

When toggled to "Item Shown", type "Enter Notes" and (if you'd like)
include a text arrow " ----->" pointing towards where the floating container will pop up. (You are
able to move the "shown" floating container with your mouse and place it
where you'd like it to appear.)

5. Next, unselect "Floating" and place the title above the notes already placed on the dashboard.

And that's all there is to it!
Please feel free to contact me if you have any questions or comments.
Happy vizzing!

Comments
Post a Comment
Leave a reply